This is a story about love lost, love discovered anew and then the death of hope.
No, I'm sorry...that's another story. This is actually a story about naked desire and then realizing that sometimes unfulfilled desire can be nice, too.
This will be a bit rambly, because it's not the type of tight, refined concept that I usually try to put forth, but rather some thoughts that came tumbling out. (And despite the next paragraph, this really isn't a post about transmogrification. Honest.)
Ever since Blizzard announced transmogrification, I've been scouring wowhead for items to use in every slot. Being somewhat obsessive-compulsive about these sorts of things, I amassed a huge amount of things for every slot, the better to mix-and-match to create specific outfit looks.
However, the weapon slot presented a problem. As a priest, at any given time, my weapon may be a staff, a mace or a dagger. I have some great options for staff and at least one brilliant option for a mace. However, dagger was vexing me. Daggers just don't have as many remarkable designs as swords do. There are a few quite nice ones (Perdition's Blade is my current favourite among the ones I have) but I just couldn't find that out-of-this-world spectacular one. Bear in mind that I'm extremely finicky about aesthetics...there are very, very specific types of weapons that I like. So while some daggers would be viewed as spectacular by others, it's been a struggle to find that superstar for my tastes.
And then ("then" being weeks ago) I found it. "Out-of-this-world" proved to be quite apropos, as it was Algalon the Observer's own dagger, containing within it a tiny constellation: the Starshard Edge. (While it is Algalon's dagger--in so far as he wields two of them--it also drops from Mimiron's hard mode encounter and an agility dagger with the same model drops from the Iron Council's hard mode).
The problem is that it drops from Ulduar 25 and, as I noted above, only from two hard mode encounters and a third boss in Algalon that is hard mode difficulty by default. Not only is this not something I can solo, it's not even something one can do by dragging along a few friends. You still need a pretty solid raid team (around 10 people) to accompany you, and the number of raid teams who are interested in farming Ulduar 25 isn't particularly high!
However, my guild generally uses Friday nights for "retro raiding." Some of the people in my guild really enjoy achievement collecting, which is what motivates them to organize these raids every Friday. Achievements have generally not been one of my interests, so I only went rarely. I've gone a few times recently, since the possibility of items for transmogging made older raids more fun to me again (and transmog-worthy gear is also of interest to the aforementioned achievement-hunters). What I've found is that just playing with others that I know is actually more fun than I thought, especially when the content is still challenging (due to under-manning it).
In any case, this Friday, with no clear objective yet in mind when the guild master got the group together, they were kind enough to go to Ulduar 25 because I requested it. Everyone, of course, had the prospect of potentially finding some gear they liked and there were 25-man achievements to be gained...but still, the impetus was my wanting something from there.
I think we all had a good time. We did some wiping early because the 7-8 people we had wasn't sufficient for 25-man Iron Council on hard mode. Later, though, we got a few more people and knocked out some bosses, including Mimiron on hard mode and Algalon.
The Starshard Edge didn't drop.
You might think I'd be extremely disappointed. Hell, I might think I'd be extremely disappointed. Getting a chance to do these hard mode encounters in 25 man format is not all that common...here I had my shot(s) and neither panned out.
It it had dropped, I'd have been overjoyed. When it didn't drop, I found that there is a special magic in not getting what you want. Trite though it may sound, it's exciting to have something out there that you really want. I can't pretend that I'm equally happy either way...I'd prefer that it had dropped. However, it was fun going after it. I wasn't upset or annoyed that it didn't drop, because that means my object of desire is still out there to excite me over the idea of acquiring it.
I suppose the correct analogy is to the holy grail...a mythic, elusive object to pursue, like a will-o'-wisp. Of course, in my case, it's largely only mythic and magical to me! However, it's a weapon and as such, I prefer to compare it to Excalibur, despite how much that muddies this analogy space.
I'm happy that I still have something in the game that has the magic of being, at least temporarily, out of reach. Not as happy as if it were actually in my grasp, of course, but it's still a happiness. I had fun doing those fights with guild members, which suggests to me that I might have a new Friday activity that I'd actually enjoy.
The Starshard Edge, probably the item I want more than any other in the game, didn't drop last night. And that's cool.
Saturday, September 24, 2011
Friday, September 23, 2011
Class Feedback - Priest
So a trend in World of Warcraft blogging is to take the feedback form post Blizzard provided in every class forum last week and fill it out as a blog post. As the last to join any trend, it's come time for me to jump off the bridge because everyone else is.
So here are my answers to the class feedback form, from the perspective of someone who mainly plays a discipline priest, but enjoys healing on a paladin, shaman and druid, has a passing interest and random experience with ranged and melee DPS and reads about tanking but doesn't do it.
PvE. All PvE, all the time. No PvP. Negative time spent on PvP.
Heavy focus on raiding. I run dungeons only in the service of raiding (gearing up, capping valor points for the week, that sort of thing). Well, I also sometimes run dungeons in all-friend groups just for the fun of it. That isn't my focus in the game, though.
Really, they're largely graphical issues. I very much enjoyed the "flinch" effect that Penance had on friendly targets and the Divine Aegis soap bubble was really attractive. Now they're gone. (So sad!) These types of things don't improve or reduce my effectiveness but they do affect my enjoyment of the game, so they're "quality of life" issues to me.
Nothing. Honestly, there's nothing that ever makes me feel like playing a priest isn't much fun. I think that means that I feel priests are really well-designed at the moment!
AoE healing is largely one button: Prayer of Healing. Sure, you want to get Prayer of Mending out on cooldown, you can pop longer cooldown spells and you can weave in Power Word: Shields for the haste buff if your mana will allow it. But the thing that makes priest AoE healing so powerful (a spammable AoE heal) also dooms it to feeling a little spammy.
However, this isn't a contradiction of what I said above, about there being nothing that isn't fun. While AoE healing can get a little more repetitive than might be ideal, it's very satisfying to see the green numbers flood the screen and everyone sporting a Divine Aegis bubble. It feels powerful, like you're pumping out healing, and that's fun.
What spells do you use the least?
So here are my answers to the class feedback form, from the perspective of someone who mainly plays a discipline priest, but enjoys healing on a paladin, shaman and druid, has a passing interest and random experience with ranged and melee DPS and reads about tanking but doesn't do it.
What type of content do you focus on? [PvE/PvP/Both]
PvE. All PvE, all the time. No PvP. Negative time spent on PvP.
If PvE, what type of PvE? [Heroics/Raids/Other]
Heavy focus on raiding. I run dungeons only in the service of raiding (gearing up, capping valor points for the week, that sort of thing). Well, I also sometimes run dungeons in all-friend groups just for the fun of it. That isn't my focus in the game, though.
What are your biggest quality-of-life issues? For instance, no longer requiring ammo could be considered a quality-of-life improvement for hunters.
Really, they're largely graphical issues. I very much enjoyed the "flinch" effect that Penance had on friendly targets and the Divine Aegis soap bubble was really attractive. Now they're gone. (So sad!) These types of things don't improve or reduce my effectiveness but they do affect my enjoyment of the game, so they're "quality of life" issues to me.
What makes playing your class more fun?
- The stylishness. I think discipline priests are the most visually spectacular of the healing classes, with Penance, Prayer of Mending, Power Word: Shield, Divine Aegis before the style-nerf, Holy Fire and Archangel for smite specs and Power Word: Barrier. Call us the "golden glow" healers.
- The versatility. Whether or not you play discipline or holy, you can cover any assignment and fill virtually any healing role. Holy has Chakra to help switch modes, while discipline priests, with the aid of Divine Aegis, can quickly get a lot of healing+protection to a lot of targets or just focus on single targets to fantastic effect.
- The large toolbox. Priests have a lot of spells that are useful in raiding environments. They have a lot of cooldowns available to them and a lot of regularly-used healing spells. It can take a little while to become instinctive with so many spells, but it's a lot of fun to have an arsenal of spells at your disposal.
- Stat complexity. For discipline, the relative merits of spirit, haste, critical strike and mastery are hotly (and I do mean hotly) debated. It is impossible to find a consensus on even the single-best secondary stat, let alone an entire stat priority system. Because discipline brings healing, absorption and mitigation, a discipline priest can play in a huge variety of ways (and should play in a variety of ways, depending on raid format, composition and fight). That means correct stat priorities can vary from priest to priest. It gives us a lot to ponder and experiment with and I think that creates a richer experience than something like, "Stack haste to this plateau, then get critical strike to this soft cap, then stack spirit. Avoid mastery like the plague."
What makes playing your class less fun?
Nothing. Honestly, there's nothing that ever makes me feel like playing a priest isn't much fun. I think that means that I feel priests are really well-designed at the moment!
How do you feel about your “rotation”? (Rotation is the accepted order in which abilities are used to maximum efficiency.)
AoE healing is largely one button: Prayer of Healing. Sure, you want to get Prayer of Mending out on cooldown, you can pop longer cooldown spells and you can weave in Power Word: Shields for the haste buff if your mana will allow it. But the thing that makes priest AoE healing so powerful (a spammable AoE heal) also dooms it to feeling a little spammy.
However, this isn't a contradiction of what I said above, about there being nothing that isn't fun. While AoE healing can get a little more repetitive than might be ideal, it's very satisfying to see the green numbers flood the screen and everyone sporting a Divine Aegis bubble. It feels powerful, like you're pumping out healing, and that's fun.
What’s on your wish list for your class?
- Lightwell. I think putting a large part of holy's effectiveness in the hands of others is less than ideal. On the other hand making lightwell a purely passive healing mechanic would also be less than ideal. My modest proposal is that the priest can place it wherever she pleases and whenever she clicks it, it puts the HoT on the lowest-health person within range. The range can be rather small, so that positioning of the Lightwell and timing of clicks matters a lot. I think this strikes a good balance between keeping the healing within the hands of the priest while still not making it "free healing" (in terms of mental resources).
- Renew. I'd like to see Renew strengthened for discipline priests, even if it means something else is reduced a bit in effectiveness. Maybe that's not a great suggestion from a min/max standpoint (generally, you do better if you have one or two god-level spells with everything else crap--since you can bias your casting patterns to favoring those great spells--than if you can do everything at a mild level) but I really would like to have a HoT that is useful more than once per five hours of raid time, just from a play-style enjoyment level. I find the very, very rare use for it here and there, but it's generally not even worth thinking about for discipline. I'd like to use it more.
- Prayer of Mending. If it sits on someone for a certain length of time (like 10 seconds) without that person taking any damage, let it jump as normal but without doing any healing on the jump. There's something very frustrating about seeing a Prayer of Mending die on someone. You definitely should be trying to intelligently choose targets such that you maximize its chances of jumping, but that still doesn't always avoid the Prayer of Mending dead ends. By preventing it from healing when it "duration jumps," you still lose some of its effectiveness, keeping intact the incentive to choose targets wisely.
What spells do you use the least?
- Holy Nova (just a novelty spell at present...I amuse myself by spamming it on Eyes of Occu'thar phases in Baradin Hold. It also totally won the Molten Core dailies, tagging mobs and healing up the quest mobs that you need to heal for one of the dailies. No true raid value, though.)
- All the usual suspects--Mind Soothe, Mind Vision, Shackle Undead
Monday, September 19, 2011
Streamlined Grid
I was asked about Grid the other day, whether I had written anything about setting it up. "No," responded I, "As I'm not particularly fancy in my usage of it, I've never had anything particularly unique to say about it, that wouldn't be covered it the set-up guide."
Then I looked at the set-up guide.
It's perfectly competently written, and covers everything. It just seems a bit...dry and perhaps confusing to someone who's never used Grid before. It's the geek's direct approach for how to geek it up (and I don't mean that pejoratively...why, I've been accused of geek tendencies in my lifetime).
After seeing that, I thought, hey, maybe this can be my contribution. Writing a guide to simplify the process of using Grid badly...just like me!
So let's dig in. (By the way, I'm assuming you have installed Grid already. Make sure you type "/grid" on the in-game command prompt to bring up the Grid configuration panel.)
Make It Look Like You Want It To Look
There are three main things that will affect the majority of the look. Make sure you're on the Frame tab.
Drag the Grid frames to wherever you want them to live long-term, then click on the Layout tab in the Grid configuration pane and check off Frame Lock. Now it won't move, you won't accidentally drag it while playing.
Okay, you're now set up in terms of the visual look, at a minimal level. There are many more options that I won't go into...you can explore them at your own discretion when you have time and inclination. The above steps should at least provide you with something that doesn't make your eyes bleed. Hopefully, at least!
First You Get The Status, Then You Get The Power...
Here's the way Grid works to relay you information: you define the pieces of information you'd like to know about a player (these pieces are called, in Grid terminology, statuses), then you indicate where and how each of those pieces of information (or statuses) should be displayed on the player's frame (the "where and how" is known as indicators). Define your statuses, tell Grid how to indicate them to you. Status, indicator.
Let's start with statuses.
Click on the Status tab in the Grid configuration pane. Grid comes pre-packaged with a lot of useful possible statuses to be displayed (and you can get more with plugins, but we'll come to that later) and you'll see them listed in the scrollable list on the left-hand side.
The thing about Grid is that it actually is quite usable straight out of the box. So some of the statuses that would be crucial to track already are set up. Let's look at a class-independent status, for the sake of example.
If you scroll down the list, you'll come to a Health category, which (if it's not already open) you can open by clicking the red button. The crucial one in this is Unit Health. Raid frames, especially for healers, are useless if you can't track the health of each person. Click on it.
On the right side, you'll see options specific to this status. For most statuses, there will be a Color option, which will allow you to choose the color that the indicator for this status will use. However, in this specific case, there's an alternate coloration option that will supercede the Color option, which is Use class color. If you have this checked off, each person's health bar will use the color associated with their class (i.e. red for death knights, white for priests, light blue for mages, etc). This is a common choice, because it allows you to get an extra piece of information (the class of that frame's player) with no extra space taken up, but it's far from a universal choice. Some people prefer a uniform color (traditionally, green). If you'd like a uniform color, uncheck that option and click on the color swatch box next to the word Color and select the color you want from the color picker.
The other option that will be common to any status is Priority. The number you select for this option determines the relative importance for this status. This matters only when you elect to have two or more statuses indicated in the same place on a frame. When both are eligible to be shown (the conditions have been met for each) the higher priority status will be displayed. A common use for this functionality is for priests to indicate Power Word: Shield and Weakened Soul in the same place, with Power Word: Shield as the higher priority. You know for a fact that if you have either a Power Word: Shield or a Weakened Soul debuff on a target, you either can't or won't want to re-shield them, so there's no real value to knowing that Weakened Soul is up if Power Word: Shield is. Therefore, you use this priority system to display Power Word: Shield until it's gone and then, if Weakened Soul is still up, that gets displayed until it, too, is gone. An elegant way to save space without losing any necessary information.
Beyond that, you'll have statuses for common class-specific spells you put on other people, like Rejuvenation for druids or Beacon of Light for paladins. Each status may have its own options that are relevant for that particular piece of information. Make sure to look at those options and mess around with them a bit to make sure it will display in the most useful fashion to you. There are also statuses for common (in combat) buffs and debuffs. Explore them and start configuring any that you feel are important for you to know about while healing an encounter.
Of course, to make a status actually display, we need the next part of the process.
All Indications Point To Standing In Fire
So let's put some of these statuses to use, via indicators. Click on the Indicators tab in the Grid configuration pane.
Indicators have two attributes. They're primarily identified by their location (Center Text, Top Right Corner, etc) but each indicator has only a limited number of ways it can display the information.
You'll see that there are a number of options, in the scrollable list on the left side, for where you can display information, and some already have statuses associated with them by default. The most common place to put indicators are in the corners of the frame. You can also use colored borders, the text in the center, the icon in the center, the four sides and the health bar itself to display information.
As for the ways in which these indicators can display the information, out of the box, you can display little boxes or numbers in the corners, numbers on the sides, text and/or an icon in the center, and colors on the health bar and border. You can also use the frame alpha (the frame's transparency, essentially) for statuses.
If you click on an indicator type, like Healing Bar, you'll see on the right side all the possible statuses you can display with that indicator with check boxes. Anything you check off, Grid will attempt to show on that indicator. Bear in mind that if you attempt to put a status that has a display type on an indicator that can't display that type, it just won't show up. Out of the box, you can't display icons in the corner, so if you attempt to put an icon-only display status in a corner, you won't see anything.
In the case of Healing Bar, Grid comes with Incoming Heals checked off. This will show a color overlay on the health bar, in whatever color you configured in the Incoming Heals status, whenever you or another healer is in the middle of casting a heal on that target, giving you a rough approximation of where that target's health will be once the heals land (helping you overheal less).
So this is the section where you put all those lovely statuses to work, arranging where you want them to be presented to you. Many of your class-specific spells will already be set up to show, so cast spells on yourself that put (short-term) buffs and debuffs on the target (like HoTs or shields or Beacon of Light) and see how Grid displays them. If you would prefer they get presented elsewhere, go into the Indicators section, uncheck them from the indicator they are currently on and check them off on the indicators you'd like them to be shown on.
Maybe you don't want Rejuvenation's duration shown in the upper-right corner, you'd like it shown in the lower-left corner. Maybe you don't want aggro shown for a target as a red border, but rather as a red box in the lower-right corner. These are the types of design decisions you can make.
Creating Your Own Statuses
So now you know what statuses are and what indicators are and their relationship to each other. Hopefully you now know these things, at least, assuming I wrote clearly. However, what if you want to display some information that isn't included with the default Grid?
As an example, Shannox, a Fireland boss, has two dog-like companions. One of them races around the raid, chewing the faces off of random people. Suppose you're a healer tasked with keeping these people's faces on...it would be more than passingly useful to know whom the dog has targeted next for chewing.
You can do that. Rageface puts a debuff on his current target called Face Rage (not a very subtle dog). We'll set up Grid to make it obvious when one of your raidmates has this debuff, allowing you to quickly ascertain who's about to take a spike of damage.
Click on the Status tab. In the list column on the left side, click on the Auras category header. Once you do that, the right side should have two text input fields, one labeled Add new Buff and one labeled Add new Debuff. Click to put a text cursor in the Add new Debuff input field and type "Face Rage" (without the quotation marks). Then press the Okay button that should appear on the right side of the text input field.
Now, scroll down the list of Auras, until you see Debuff: Face Rage and click on it. The right side will now give you the options you can set for your new status. Make sure Enable is checked off (you should do this for any status you want to use). You can selectively enable or disable this debuff per class...if, for example, you didn't want to be notified when a druid acquired this debuff, you'd uncheck Druid. However, we want this debuff to show up for any class that gets it. So all classes should be checked off. Select a bright color that will be easy for you to see, since you want this to be obvious when it happens. You probably want to jack the priority up to 99...it's your number one priority to know about when it happens. The Show duration option is something that can be useful for a number of buffs and debuffs, so be aware of it...however, this debuff gets removed when one of your DPS crits Rageface, so it's not needed in this case.
You now have a perfectly functional Face Rage status. You just have to put in play. You'll do this in exactly the same way you use indicators for any of the other statuses. A user-created status is just as usable as one that comes with Grid. Your status can be displayed by a color or box indicator or, if you checked off the Show duration checkbox, by a number indicator.
If You'd Like To Do More
These are just the basics of Grid, getting you up to speed with how it works and the major tools. There are a great many plugins for Grid that will add new indicators (like being able to display icons in the corners) or statuses (perhaps you want to track the absorb effects on a target). Some statuses are so cleverly coded that they will even act as new functionality.
You can find a nice list of Grid plugins to peruse here.
I use some of these. They're quite easy to use...you install them like any other add-on and they get listed in the left-hand column in either the Status or Indicators tab, and you just select them, set the options and proceed to use them just as we went through above.
I Have No Pithy Way To End This
So here's this. Enjoy (and hopefully have a long and productive career with Grid).
Then I looked at the set-up guide.
It's perfectly competently written, and covers everything. It just seems a bit...dry and perhaps confusing to someone who's never used Grid before. It's the geek's direct approach for how to geek it up (and I don't mean that pejoratively...why, I've been accused of geek tendencies in my lifetime).
After seeing that, I thought, hey, maybe this can be my contribution. Writing a guide to simplify the process of using Grid badly...just like me!
So let's dig in. (By the way, I'm assuming you have installed Grid already. Make sure you type "/grid" on the in-game command prompt to bring up the Grid configuration panel.)
Make It Look Like You Want It To Look
There are three main things that will affect the majority of the look. Make sure you're on the Frame tab.
- Frame Width/Frame Height: Play with the sliders until the box representing a single player's health is just right. You want it to be large enough that you can comfortably discern the health and see various symbols in the corners or on the sides, but not so large that ten or twenty five of these boxes will cover too much of your view space. After all, you need to get out of the poison, too.
- Invert Bar Color: This determines whether a player of full health will have a fully colored bar (check off Invert Bar Color) or a fully black bar (leave it unchecked). Does losing health drain the bar of color or fill it up with color? For practical purposes, they're equivalent but different indicators...but one may be more intuitive to you than the other for knowing at a glance where everyone's health stands.
- Frame Texture: This will determine, essentially, the glossiness and pattern of each person's health bar. Some people don't care about that, some do. Try out some at random to see if it even makes a difference to you. If it does, go through the options to determine which look is right for you.
Drag the Grid frames to wherever you want them to live long-term, then click on the Layout tab in the Grid configuration pane and check off Frame Lock. Now it won't move, you won't accidentally drag it while playing.
Okay, you're now set up in terms of the visual look, at a minimal level. There are many more options that I won't go into...you can explore them at your own discretion when you have time and inclination. The above steps should at least provide you with something that doesn't make your eyes bleed. Hopefully, at least!
First You Get The Status, Then You Get The Power...
Here's the way Grid works to relay you information: you define the pieces of information you'd like to know about a player (these pieces are called, in Grid terminology, statuses), then you indicate where and how each of those pieces of information (or statuses) should be displayed on the player's frame (the "where and how" is known as indicators). Define your statuses, tell Grid how to indicate them to you. Status, indicator.
Let's start with statuses.
Click on the Status tab in the Grid configuration pane. Grid comes pre-packaged with a lot of useful possible statuses to be displayed (and you can get more with plugins, but we'll come to that later) and you'll see them listed in the scrollable list on the left-hand side.
The thing about Grid is that it actually is quite usable straight out of the box. So some of the statuses that would be crucial to track already are set up. Let's look at a class-independent status, for the sake of example.
If you scroll down the list, you'll come to a Health category, which (if it's not already open) you can open by clicking the red button. The crucial one in this is Unit Health. Raid frames, especially for healers, are useless if you can't track the health of each person. Click on it.
On the right side, you'll see options specific to this status. For most statuses, there will be a Color option, which will allow you to choose the color that the indicator for this status will use. However, in this specific case, there's an alternate coloration option that will supercede the Color option, which is Use class color. If you have this checked off, each person's health bar will use the color associated with their class (i.e. red for death knights, white for priests, light blue for mages, etc). This is a common choice, because it allows you to get an extra piece of information (the class of that frame's player) with no extra space taken up, but it's far from a universal choice. Some people prefer a uniform color (traditionally, green). If you'd like a uniform color, uncheck that option and click on the color swatch box next to the word Color and select the color you want from the color picker.
The other option that will be common to any status is Priority. The number you select for this option determines the relative importance for this status. This matters only when you elect to have two or more statuses indicated in the same place on a frame. When both are eligible to be shown (the conditions have been met for each) the higher priority status will be displayed. A common use for this functionality is for priests to indicate Power Word: Shield and Weakened Soul in the same place, with Power Word: Shield as the higher priority. You know for a fact that if you have either a Power Word: Shield or a Weakened Soul debuff on a target, you either can't or won't want to re-shield them, so there's no real value to knowing that Weakened Soul is up if Power Word: Shield is. Therefore, you use this priority system to display Power Word: Shield until it's gone and then, if Weakened Soul is still up, that gets displayed until it, too, is gone. An elegant way to save space without losing any necessary information.
Beyond that, you'll have statuses for common class-specific spells you put on other people, like Rejuvenation for druids or Beacon of Light for paladins. Each status may have its own options that are relevant for that particular piece of information. Make sure to look at those options and mess around with them a bit to make sure it will display in the most useful fashion to you. There are also statuses for common (in combat) buffs and debuffs. Explore them and start configuring any that you feel are important for you to know about while healing an encounter.
Of course, to make a status actually display, we need the next part of the process.
All Indications Point To Standing In Fire
So let's put some of these statuses to use, via indicators. Click on the Indicators tab in the Grid configuration pane.
Indicators have two attributes. They're primarily identified by their location (Center Text, Top Right Corner, etc) but each indicator has only a limited number of ways it can display the information.
You'll see that there are a number of options, in the scrollable list on the left side, for where you can display information, and some already have statuses associated with them by default. The most common place to put indicators are in the corners of the frame. You can also use colored borders, the text in the center, the icon in the center, the four sides and the health bar itself to display information.
As for the ways in which these indicators can display the information, out of the box, you can display little boxes or numbers in the corners, numbers on the sides, text and/or an icon in the center, and colors on the health bar and border. You can also use the frame alpha (the frame's transparency, essentially) for statuses.
If you click on an indicator type, like Healing Bar, you'll see on the right side all the possible statuses you can display with that indicator with check boxes. Anything you check off, Grid will attempt to show on that indicator. Bear in mind that if you attempt to put a status that has a display type on an indicator that can't display that type, it just won't show up. Out of the box, you can't display icons in the corner, so if you attempt to put an icon-only display status in a corner, you won't see anything.
In the case of Healing Bar, Grid comes with Incoming Heals checked off. This will show a color overlay on the health bar, in whatever color you configured in the Incoming Heals status, whenever you or another healer is in the middle of casting a heal on that target, giving you a rough approximation of where that target's health will be once the heals land (helping you overheal less).
So this is the section where you put all those lovely statuses to work, arranging where you want them to be presented to you. Many of your class-specific spells will already be set up to show, so cast spells on yourself that put (short-term) buffs and debuffs on the target (like HoTs or shields or Beacon of Light) and see how Grid displays them. If you would prefer they get presented elsewhere, go into the Indicators section, uncheck them from the indicator they are currently on and check them off on the indicators you'd like them to be shown on.
Maybe you don't want Rejuvenation's duration shown in the upper-right corner, you'd like it shown in the lower-left corner. Maybe you don't want aggro shown for a target as a red border, but rather as a red box in the lower-right corner. These are the types of design decisions you can make.
Creating Your Own Statuses
So now you know what statuses are and what indicators are and their relationship to each other. Hopefully you now know these things, at least, assuming I wrote clearly. However, what if you want to display some information that isn't included with the default Grid?
As an example, Shannox, a Fireland boss, has two dog-like companions. One of them races around the raid, chewing the faces off of random people. Suppose you're a healer tasked with keeping these people's faces on...it would be more than passingly useful to know whom the dog has targeted next for chewing.
You can do that. Rageface puts a debuff on his current target called Face Rage (not a very subtle dog). We'll set up Grid to make it obvious when one of your raidmates has this debuff, allowing you to quickly ascertain who's about to take a spike of damage.
Click on the Status tab. In the list column on the left side, click on the Auras category header. Once you do that, the right side should have two text input fields, one labeled Add new Buff and one labeled Add new Debuff. Click to put a text cursor in the Add new Debuff input field and type "Face Rage" (without the quotation marks). Then press the Okay button that should appear on the right side of the text input field.
Now, scroll down the list of Auras, until you see Debuff: Face Rage and click on it. The right side will now give you the options you can set for your new status. Make sure Enable is checked off (you should do this for any status you want to use). You can selectively enable or disable this debuff per class...if, for example, you didn't want to be notified when a druid acquired this debuff, you'd uncheck Druid. However, we want this debuff to show up for any class that gets it. So all classes should be checked off. Select a bright color that will be easy for you to see, since you want this to be obvious when it happens. You probably want to jack the priority up to 99...it's your number one priority to know about when it happens. The Show duration option is something that can be useful for a number of buffs and debuffs, so be aware of it...however, this debuff gets removed when one of your DPS crits Rageface, so it's not needed in this case.
You now have a perfectly functional Face Rage status. You just have to put in play. You'll do this in exactly the same way you use indicators for any of the other statuses. A user-created status is just as usable as one that comes with Grid. Your status can be displayed by a color or box indicator or, if you checked off the Show duration checkbox, by a number indicator.
If You'd Like To Do More
These are just the basics of Grid, getting you up to speed with how it works and the major tools. There are a great many plugins for Grid that will add new indicators (like being able to display icons in the corners) or statuses (perhaps you want to track the absorb effects on a target). Some statuses are so cleverly coded that they will even act as new functionality.
You can find a nice list of Grid plugins to peruse here.
I use some of these. They're quite easy to use...you install them like any other add-on and they get listed in the left-hand column in either the Status or Indicators tab, and you just select them, set the options and proceed to use them just as we went through above.
I Have No Pithy Way To End This
So here's this. Enjoy (and hopefully have a long and productive career with Grid).
Tuesday, September 13, 2011
Transmog Tuesday: So You Want To Be A Necromancer
In my continuing desire to find ways to look one's best when running around inside raids, I've decided to present a new ensemble, somewhat darker than my last offering. This is for those of you who want to be a necromancer (or "dark wizard" archetype of your choosing) for Halloween your next post-4.3 raid.
I want to reiterate that I'm probably taking far too much glee in the upcoming transmog feature. For me, a game like World of Warcraft is just as much a venue for self-expression, if not moreso, as it is for exercising game play mechanics. I've sometimes thought that the two points of fun for me are character creation (when I can visualize a character concept while playing with the customization options and names) and raiding. Everything in between (questing, dungeons, professions, etc) is filler. That might be putting it in overly extreme terms but, suffice it to say, character customization means a lot to me.
So let's dive right in!
Head (Or "The Evil Is In The Eyes")
I knew that to be dark, my clothie had to be wearing a cowl or hood. It had to hide some of the face. You see the full face of your neighbor, your co-worker, your mother. Those who work in the shadows (assassins, necromancers) hide at least part of their faces.
There was a specific looking cowl I wanted, one I had seen on my rogue when leveling using heirlooms. The Stained Shadowcraft Cap has a really nice, secretive look to it. So I dialed it up on wowhead and clicked on their wonderful "Same model as" tab to find a cloth version.
There was precisely one. The Abjurer's Hood. It wasn't black as I would have desired, ideally, but the rich blue was something I could work with in a dark set. If it had been yellow or green, I'd have been quite out of luck!

It really can't be farmed out in the world, as the drop rates for it are abysmal. Rather, I had to count on the combined farming efforts of the entire server (it's the Ahn-Qiraj war effort all over again!) and camp the auction house patiently. It took a few weeks, but I successfully stalked my prey and put the trophy in my bank.
Shoulders (Or "The Dark Cloud Around You")
This one was fairly straightforward. I wanted black shoulders with either silver or white accents, and there was an extremely accessible set that looked very nice: the Black Mageweave Shoulders.

Now, the Black Mageweave set has a measure of infamy for the Playboy Bunny-style garters and bodice that are a part of the set, but not all of it is for tarting up your female character, as you can see above! Necromancers don't have sex (at least, unless you're into certain fetishes).
Chest (Or "Everything Goes With Black")
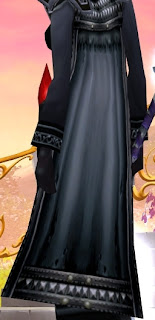
Clearly, I'm not trying to reinvent the necromancer, here. This is going to be a dark set. There are several "actual black" looks (there are some other robes that are "off-black" but don't have that same, satisfyingly inky look), and I narrowed it down to one look that can be created with either one relatively rare robe or two not-too-rare pieces of gear.
This is the look:

There are two routes to this silver-and-black look. One is the Black Velvet Robes. This is a reasonably rare drop blue item, so it may take a while to find it on the auction house. The other option is to combine the Silver-Thread Robe with the Stylish Black Shirt. The shirt, obviously, you'll have to actually wear since you can't use a white no-stats item for transmog...but shirts aren't stat-generating gear, so it's no hardship to actually wear it. The Silver-Thread Robe leaves one's arms bare, which is why the shirt is needed, to provide the sleeves. Bared arms can be a sexy look, but it looks passing strange on a srs bsns necromancer.
Waist (Or "Free Accent Piece!")
Hey, remember that blue cowl-mask-thing? Well, I think it looks pretty cool, but it's going to look more than a bit out of place if it's the only blue in the ensemble. Maybe there should be a little bit more blue in order to make blue a true accent color, rather than a jarringly out-of-place color choice on the head. Fortunately, blue makes a nice accent to black.
Focusing in on the waist, we have:

It's a black belt with a sapphire at the center, as the buckle, known as the Sorcerer Sash. It matches the hood rather nicely, setting it off strikingly!
Cloak (Or "If You Have No Shadow To Stand In, Bring Your Own")
A good cloak or cape is essential to a strong outfit. Sure, you can hide your cloak (and I've done that often, when I've had an ugly cloak) but there's no fun in that when you can select your cape!
It's actually extremely hard to find a pure back cloak, more's the pity. Most of the darkest are very dark purple or brown. The closest I could find was a dark gray one that's almost black. A guildie of mine mentioned it on the auction house. I had already looked at it (on wowhead) and dismissed it as "not black." But after re-evaluating, I realized it was my best option. It cost quite a bit (it's a hard-to-find drop from Doomwalker, a world raid boss that is rarely wandering around) but it was worth it to me. What's gold worth, really (at least until the real-money auction house tells us!). Since she didn't want it, I figured I'd pick it up.
So, this is the cloak that you've probably seen peeking around the robe in some of the above screenshots, the Black-Iron Battlecloak.
Boots And Gloves (Or "No Big Deal")
I won't say much here, or bother with screenshots. They're just black gloves and shoes. I chose the Heroes' Gloves of Faith and the Black Mageweave Boots (again, nothing salacious!), but there are a lot of ways you could go here.
Weapons (Or "How To Make A Necromancer Look Like She Wants Your Gizzard")
There are a couple of choices, here. I focused on a staff option and a dagger plus off-hand option. Maces just don't "feel" like necromancy. Not sharp enough to make dark sacrifices, I'm sure.
Let's start with the staff. There are a few nicely evil staves, but I think nothing quite encapsulates the life-stealing bad of a scythe. More specifically, Lord Ahune's Frost Scythe.

It's got blue highlights, fitting the accent color we set with the cowl and belt, and a scythe has a very grim reaper feel--which has a pretty clear connection with death. In addition, it has a wonderful icy glow. It just screams death, as far as I'm concerned.
The other option here is the dagger and offhand combination. I selected this sleek, understated dagger that looks perfect for disemboweling innocents in ritual sacrifice (not that I busy my mind thinking about such things...) with an eerie purple glow. I paired a book-model offhand with it, as a grimoire, conceptually.

The dagger is the Mindfang (Horde) or the Sageclaw (Alliance). The book I used was the Fire Runed Grimoire from Molten Core, but there are many off-hand options that look like books. Another option for that model of dagger is the Sorcerous Dagger, also from Molten Core. It looks the same but has a green glow. Ultimately, I felt the purple fit better.
Putting It All Together
So there we have it. Here's what the completed outfit looks like, front and back.


I'll also provide a wowhead export for the ensemble, with the three-dimensional modeling, so you can examine it yourself and play around with it, adding and subtracting to it as you please.
Model It!
So, why would anyone want to be a necromancer? Because dark and dangerous is sexy, regardless of your affiliation. I play a priest main, a healing priest no less...and I will greatly enjoy sporting this look at some point.
As always, I hope this spurs you into pondering how you can tailor a look for yourself, possibly one that goes beyond tier sets. There are a lot of lovely weapons and pieces of armor out there, many of them merely uncommon and rare. Play around with them, find something that suits you!
I want to reiterate that I'm probably taking far too much glee in the upcoming transmog feature. For me, a game like World of Warcraft is just as much a venue for self-expression, if not moreso, as it is for exercising game play mechanics. I've sometimes thought that the two points of fun for me are character creation (when I can visualize a character concept while playing with the customization options and names) and raiding. Everything in between (questing, dungeons, professions, etc) is filler. That might be putting it in overly extreme terms but, suffice it to say, character customization means a lot to me.
So let's dive right in!
Head (Or "The Evil Is In The Eyes")
I knew that to be dark, my clothie had to be wearing a cowl or hood. It had to hide some of the face. You see the full face of your neighbor, your co-worker, your mother. Those who work in the shadows (assassins, necromancers) hide at least part of their faces.
There was a specific looking cowl I wanted, one I had seen on my rogue when leveling using heirlooms. The Stained Shadowcraft Cap has a really nice, secretive look to it. So I dialed it up on wowhead and clicked on their wonderful "Same model as" tab to find a cloth version.
There was precisely one. The Abjurer's Hood. It wasn't black as I would have desired, ideally, but the rich blue was something I could work with in a dark set. If it had been yellow or green, I'd have been quite out of luck!
It really can't be farmed out in the world, as the drop rates for it are abysmal. Rather, I had to count on the combined farming efforts of the entire server (it's the Ahn-Qiraj war effort all over again!) and camp the auction house patiently. It took a few weeks, but I successfully stalked my prey and put the trophy in my bank.
Shoulders (Or "The Dark Cloud Around You")
This one was fairly straightforward. I wanted black shoulders with either silver or white accents, and there was an extremely accessible set that looked very nice: the Black Mageweave Shoulders.
Now, the Black Mageweave set has a measure of infamy for the Playboy Bunny-style garters and bodice that are a part of the set, but not all of it is for tarting up your female character, as you can see above! Necromancers don't have sex (at least, unless you're into certain fetishes).
Chest (Or "Everything Goes With Black")
Clearly, I'm not trying to reinvent the necromancer, here. This is going to be a dark set. There are several "actual black" looks (there are some other robes that are "off-black" but don't have that same, satisfyingly inky look), and I narrowed it down to one look that can be created with either one relatively rare robe or two not-too-rare pieces of gear.
This is the look:

There are two routes to this silver-and-black look. One is the Black Velvet Robes. This is a reasonably rare drop blue item, so it may take a while to find it on the auction house. The other option is to combine the Silver-Thread Robe with the Stylish Black Shirt. The shirt, obviously, you'll have to actually wear since you can't use a white no-stats item for transmog...but shirts aren't stat-generating gear, so it's no hardship to actually wear it. The Silver-Thread Robe leaves one's arms bare, which is why the shirt is needed, to provide the sleeves. Bared arms can be a sexy look, but it looks passing strange on a srs bsns necromancer.
Waist (Or "Free Accent Piece!")
Hey, remember that blue cowl-mask-thing? Well, I think it looks pretty cool, but it's going to look more than a bit out of place if it's the only blue in the ensemble. Maybe there should be a little bit more blue in order to make blue a true accent color, rather than a jarringly out-of-place color choice on the head. Fortunately, blue makes a nice accent to black.
Focusing in on the waist, we have:
It's a black belt with a sapphire at the center, as the buckle, known as the Sorcerer Sash. It matches the hood rather nicely, setting it off strikingly!
Cloak (Or "If You Have No Shadow To Stand In, Bring Your Own")
A good cloak or cape is essential to a strong outfit. Sure, you can hide your cloak (and I've done that often, when I've had an ugly cloak) but there's no fun in that when you can select your cape!
It's actually extremely hard to find a pure back cloak, more's the pity. Most of the darkest are very dark purple or brown. The closest I could find was a dark gray one that's almost black. A guildie of mine mentioned it on the auction house. I had already looked at it (on wowhead) and dismissed it as "not black." But after re-evaluating, I realized it was my best option. It cost quite a bit (it's a hard-to-find drop from Doomwalker, a world raid boss that is rarely wandering around) but it was worth it to me. What's gold worth, really (at least until the real-money auction house tells us!). Since she didn't want it, I figured I'd pick it up.
So, this is the cloak that you've probably seen peeking around the robe in some of the above screenshots, the Black-Iron Battlecloak.

Boots And Gloves (Or "No Big Deal")
I won't say much here, or bother with screenshots. They're just black gloves and shoes. I chose the Heroes' Gloves of Faith and the Black Mageweave Boots (again, nothing salacious!), but there are a lot of ways you could go here.
Weapons (Or "How To Make A Necromancer Look Like She Wants Your Gizzard")
There are a couple of choices, here. I focused on a staff option and a dagger plus off-hand option. Maces just don't "feel" like necromancy. Not sharp enough to make dark sacrifices, I'm sure.
Let's start with the staff. There are a few nicely evil staves, but I think nothing quite encapsulates the life-stealing bad of a scythe. More specifically, Lord Ahune's Frost Scythe.

It's got blue highlights, fitting the accent color we set with the cowl and belt, and a scythe has a very grim reaper feel--which has a pretty clear connection with death. In addition, it has a wonderful icy glow. It just screams death, as far as I'm concerned.
The other option here is the dagger and offhand combination. I selected this sleek, understated dagger that looks perfect for disemboweling innocents in ritual sacrifice (not that I busy my mind thinking about such things...) with an eerie purple glow. I paired a book-model offhand with it, as a grimoire, conceptually.
The dagger is the Mindfang (Horde) or the Sageclaw (Alliance). The book I used was the Fire Runed Grimoire from Molten Core, but there are many off-hand options that look like books. Another option for that model of dagger is the Sorcerous Dagger, also from Molten Core. It looks the same but has a green glow. Ultimately, I felt the purple fit better.
Putting It All Together
So there we have it. Here's what the completed outfit looks like, front and back.


I'll also provide a wowhead export for the ensemble, with the three-dimensional modeling, so you can examine it yourself and play around with it, adding and subtracting to it as you please.
Model It!
So, why would anyone want to be a necromancer? Because dark and dangerous is sexy, regardless of your affiliation. I play a priest main, a healing priest no less...and I will greatly enjoy sporting this look at some point.
As always, I hope this spurs you into pondering how you can tailor a look for yourself, possibly one that goes beyond tier sets. There are a lot of lovely weapons and pieces of armor out there, many of them merely uncommon and rare. Play around with them, find something that suits you!
Friday, September 9, 2011
Elune, We Have A Problem
Sometimes when progressing through raid content, you encounter an unusual situation: you're failing. To be more specific, you're repeatedly falling victim to an avoidable damage mechanic. Hopefully, this situation doesn't arise often for you but when it does, it's vexing.
The other night, I found myself in this predicament. This is quite unusual for me. I'm not an infallible superstar by any means; I sometimes make mistakes with decision-making or will die to something I shouldn't have. However, I'm usually extremely good about not getting blown to bits by a straightforward, avoidable mechanic and I almost never make the same mistake repeatedly.
That being said, that is exactly what happened to me against Ragnaros. When he does his Sulfuras Smash (bringing down his hammer somewhere on the platform you engage him from) three waves of lava spawn from the impact point and rush away from the hammer: directly away from Ragnaros and in each direction perpendicular from the vector of the wave racing away from Ragnaros. (It's simpler in reality than to explain, basically it's right, left and forward).
This should be easy to avoid. Every guide says it is, it looks like it is to me and it's the type of thing I usually avoid with ease...without even thinking about it. Be that as it may, I was not avoiding it with ease. I wasn't getting hit by it every time (thankfully) but I was dying to it far more than I should have, which put a strain on my fellow healer and, thus, the raid.
So what do you do when this happens? It's frustrating, all the more so because it feels so out of character and you wonder if your raidmates are silently judging you. Maybe it's just a bad night, or perhaps it isn't. What's called for is a diagnostic process! We love processes here at Holy Word: Delicious. If all of life could be boiled down to a process, we here at Holy Word: Delicious would die happy (according to a proper death process).
Step One: What is the nature of the fail?
Obviously, you have to start with identifying what's going wrong. Nothing drives me to distraction more than someone responding to a "How did you die?" query with "I dunno."* If it wasn't apparent to you when you actually died, check logs and figure out what it was. Not knowing means it's going to happen again. And again. There are some useful tools to figure these things out, even during the raid. Make sure you always have some way to go back and check what happened, if it wasn't clearly apparent. You always have the in-game combat log, if it comes to that.
*You can get the craziest accounts from these types of people. "It was so weird, I was just standing there and then suddenly I was dead! Might be some kind of bug, because I was totally not standing in anything and didn't do anything wrong. What's that? There's a debuff the boss puts on you during that stage that makes you explode if you don't /point and then /dance? I didn't know that but I'm pretty sure that's not what happened. I don't think I had a debuff. I think it was a bug."
In my case, it was the above-mentioned Lava Waves that are produced from the Sulfuras Smash. Pretty cut and dry. I saw it hit me, I saw the DoT it placed on me and I saw my charred corpse immediately after. The arrow of causality isn't too hard to draw there.
The first step of the process, then, is knowing what the fail is.
Step Two: Why are you failing to that?
Would you like to be killed by this mechanic? (Y/N)
> nah
You do not fail.
> pew-pew
You critical strike the boss for ***48302*** damage!
This is not how World of Warcraft works ever since build 2938.12.21 in the original beta. Sadly. If we could simply choose not to fail, we never would. We are (generally) trying to never fail. So when we fail to something, there has to be a reason why. Why, despite presumably not wanting to fail, did we fail? (Believe me, even if you're not asking yourself that question, your raid leader likely will be eventually.)
So you have to have some sense of self-awareness. You have to be thinking about what's going on, or at least passively recording the events in your mind so that you can revisit them from memory after the fact and do a post-mortem. You need to know why that mechanic was a problem for you.
Here it was in my case: We were two healing Ragnaros (ten-man raid, obviously), which is quite do-able. I was primarily responsible for the tanks, but couldn't focus entirely on them. When two-healing the encounter, the raid can't afford one healer to be healing the tanks and no one else. There's too much damage to too many spread out people when things like magma traps are set off.
The tank damage was fairly spiky. The tanks swap due to the stacking Burning Wound debuff that Ragnaros applies to the tank he's currently pummeling (exacerbated by the Burning Blast ability that causes damage based on the Burning Wound stack). Ragnaros himself hits like a truck and the tank who isn't currently absorbing Ragnaros' abuse with his/her face is still taking enough damage from the aforementioned abilities (that take 20 seconds to drop off even when not tanking him) that that tank's health will still drop rapidly if ignored.
So. The tanks were leaking health rather rapidly and there were other raid members to heal. My best instant, Power Word: Shield, has limited value in the fight because someone who has just taken damage (other than the tanks) is not necessarily likely to take damage again within the duration of a Power Word: Shield (15 seconds). A shield that simply runs out of duration is nothing more than mana thrown into the fire (pun intended). So I don't have a ton of mobile healing. The feeling that someone would die kept me feeling anchored. This doesn't explain the failure (healers needing to move in addition to healing is nothing new), but the post-mortem isn't over.
The above issue naturally led me to trying to move the least distance possible to avoid the lava waves. Nothing wrong with that, that's what you should be trying to do. However, it led to a couple of issues.
These two situations were what were undoing me. This ties into the stationary feeling of having to heal without pause because, frankly, I was using flawed strategies to avoid waves in those two situations to minimize casting down time.
Now, let's be clear. This is an explanation for the purpose of personal diagnosis and improvement. It's not an excuse. I was not justified in dying to those waves, I wasn't the victim of unfairness. I'm laying it out, here, not to exonerate myself in your eyes (I mean, if I worried about your judgment, I wouldn't even have mentioned this, now would I? Right?) but to provide a concrete example of how, in my view, one should approach understanding the problem to solve it. You need to be able to explain it in your own mind. This really shouldn't be for public consumption (that is, for your raid) because it will sound like excuses. And you really shouldn't be intending to use it as an excuse. Explain it to yourself and understand it but do not confuse it with excusing yourself. You need to fix it.
So step two of the process is understanding why that identified mechanic is putting you in an early grave.
Step Three: So what are you going to do about it?
Breaking your keyboard is not the right answer.
Once you've identified the problem mechanic and discovered why it's a problem, the final step is to figure out the work-around. Every problem has a solution, unless you're pushing a world's-first on a boss that wasn't released on the PTR--then the problem may not have a solution until Blizzard hotfixes it while you're in the middle of your raid. But I digress.
You've broken down the ramifications of the mechanic and identified which aspect is making it difficult...so what action will neutralize it? Sometimes it can be as simple as an add-on giving you a BIGGER WARNING on your screen (complete with Christmas lights and a wacky waving inflatable arm flailing tube man). Sometimes it will require mapping out an actual movement or spell choice strategy ahead of time. In my specific case, it was the latter.
I had identified which situations were problems: hammer dropping next to me (not on me, I never got hit by the hammer itself!) or hammer dropping very far away from me. The hammer dropping at some midway distance was no problem...seeing the diagonal quickly and moving into it was easy.
The answers, once I knew the precise nature of the problem, turned out to be easy.
Once I put these fixes into action, things got better immediately. It was immensely easier to avoid the waves and with minimum thought and movement (the better to use that thought and time for healing decision-making).
So the third step of the process is to create a plan that will work around the problems you've identified.
Step Four: I Forget What Four Was For
So, that's The Process. It's always nice to have a process to work through to solve problems. Admittedly, none of the steps I laid out are a revolution in logic, philosophy or spirituality, but it's good to formalize a thinking process rather than fall into the "Well, that sucked, I'll try to do better next time" trap. That's surprisingly easy to do and very tempting...you know the mechanic, you messed up, you'll just try harder next time. However, if there's a specific problem that's causing you to miss the mechanic, you'll probably keep failing at it until you (implicitly or explicitly) go through the above process.
Ultimately, if you still keep struggling with the mechanic, it's probably a bug. Or latency. Or a lag spike. "It was the craziest thing..."
The other night, I found myself in this predicament. This is quite unusual for me. I'm not an infallible superstar by any means; I sometimes make mistakes with decision-making or will die to something I shouldn't have. However, I'm usually extremely good about not getting blown to bits by a straightforward, avoidable mechanic and I almost never make the same mistake repeatedly.
That being said, that is exactly what happened to me against Ragnaros. When he does his Sulfuras Smash (bringing down his hammer somewhere on the platform you engage him from) three waves of lava spawn from the impact point and rush away from the hammer: directly away from Ragnaros and in each direction perpendicular from the vector of the wave racing away from Ragnaros. (It's simpler in reality than to explain, basically it's right, left and forward).
This should be easy to avoid. Every guide says it is, it looks like it is to me and it's the type of thing I usually avoid with ease...without even thinking about it. Be that as it may, I was not avoiding it with ease. I wasn't getting hit by it every time (thankfully) but I was dying to it far more than I should have, which put a strain on my fellow healer and, thus, the raid.
So what do you do when this happens? It's frustrating, all the more so because it feels so out of character and you wonder if your raidmates are silently judging you. Maybe it's just a bad night, or perhaps it isn't. What's called for is a diagnostic process! We love processes here at Holy Word: Delicious. If all of life could be boiled down to a process, we here at Holy Word: Delicious would die happy (according to a proper death process).
Step One: What is the nature of the fail?
Obviously, you have to start with identifying what's going wrong. Nothing drives me to distraction more than someone responding to a "How did you die?" query with "I dunno."* If it wasn't apparent to you when you actually died, check logs and figure out what it was. Not knowing means it's going to happen again. And again. There are some useful tools to figure these things out, even during the raid. Make sure you always have some way to go back and check what happened, if it wasn't clearly apparent. You always have the in-game combat log, if it comes to that.
*You can get the craziest accounts from these types of people. "It was so weird, I was just standing there and then suddenly I was dead! Might be some kind of bug, because I was totally not standing in anything and didn't do anything wrong. What's that? There's a debuff the boss puts on you during that stage that makes you explode if you don't /point and then /dance? I didn't know that but I'm pretty sure that's not what happened. I don't think I had a debuff. I think it was a bug."
In my case, it was the above-mentioned Lava Waves that are produced from the Sulfuras Smash. Pretty cut and dry. I saw it hit me, I saw the DoT it placed on me and I saw my charred corpse immediately after. The arrow of causality isn't too hard to draw there.
The first step of the process, then, is knowing what the fail is.
Step Two: Why are you failing to that?
Would you like to be killed by this mechanic? (Y/N)
> nah
You do not fail.
> pew-pew
You critical strike the boss for ***48302*** damage!
This is not how World of Warcraft works ever since build 2938.12.21 in the original beta. Sadly. If we could simply choose not to fail, we never would. We are (generally) trying to never fail. So when we fail to something, there has to be a reason why. Why, despite presumably not wanting to fail, did we fail? (Believe me, even if you're not asking yourself that question, your raid leader likely will be eventually.)
So you have to have some sense of self-awareness. You have to be thinking about what's going on, or at least passively recording the events in your mind so that you can revisit them from memory after the fact and do a post-mortem. You need to know why that mechanic was a problem for you.
Here it was in my case: We were two healing Ragnaros (ten-man raid, obviously), which is quite do-able. I was primarily responsible for the tanks, but couldn't focus entirely on them. When two-healing the encounter, the raid can't afford one healer to be healing the tanks and no one else. There's too much damage to too many spread out people when things like magma traps are set off.
The tank damage was fairly spiky. The tanks swap due to the stacking Burning Wound debuff that Ragnaros applies to the tank he's currently pummeling (exacerbated by the Burning Blast ability that causes damage based on the Burning Wound stack). Ragnaros himself hits like a truck and the tank who isn't currently absorbing Ragnaros' abuse with his/her face is still taking enough damage from the aforementioned abilities (that take 20 seconds to drop off even when not tanking him) that that tank's health will still drop rapidly if ignored.
So. The tanks were leaking health rather rapidly and there were other raid members to heal. My best instant, Power Word: Shield, has limited value in the fight because someone who has just taken damage (other than the tanks) is not necessarily likely to take damage again within the duration of a Power Word: Shield (15 seconds). A shield that simply runs out of duration is nothing more than mana thrown into the fire (pun intended). So I don't have a ton of mobile healing. The feeling that someone would die kept me feeling anchored. This doesn't explain the failure (healers needing to move in addition to healing is nothing new), but the post-mortem isn't over.
The above issue naturally led me to trying to move the least distance possible to avoid the lava waves. Nothing wrong with that, that's what you should be trying to do. However, it led to a couple of issues.
- If the hammer came down next to me, all I did was move to a diagonal vector from it, which is what you're supposed to do to be in the "safe zone" (since the waves move toward compass point directions relative to the hammer). However! If you're standing right next to the hammer, the waves are too close together for the diagonal to be safe...you'll still be clipped (annoyingly, the effect radius is larger than the visual radius, but that is nothing new in World of Warcraft).
- If the hammer came down far, far away from me (like on the other side of the pretty enormous platform), I was making hasty guesses as to where the straight line vectors of the waves would take them by the time they reached my vicinity and moving quickly to where I figured the "cone of safety" would be. Sometimes I guessed right, sometimes I died.
These two situations were what were undoing me. This ties into the stationary feeling of having to heal without pause because, frankly, I was using flawed strategies to avoid waves in those two situations to minimize casting down time.
Now, let's be clear. This is an explanation for the purpose of personal diagnosis and improvement. It's not an excuse. I was not justified in dying to those waves, I wasn't the victim of unfairness. I'm laying it out, here, not to exonerate myself in your eyes (I mean, if I worried about your judgment, I wouldn't even have mentioned this, now would I? Right?) but to provide a concrete example of how, in my view, one should approach understanding the problem to solve it. You need to be able to explain it in your own mind. This really shouldn't be for public consumption (that is, for your raid) because it will sound like excuses. And you really shouldn't be intending to use it as an excuse. Explain it to yourself and understand it but do not confuse it with excusing yourself. You need to fix it.
So step two of the process is understanding why that identified mechanic is putting you in an early grave.
Step Three: So what are you going to do about it?
Breaking your keyboard is not the right answer.
Once you've identified the problem mechanic and discovered why it's a problem, the final step is to figure out the work-around. Every problem has a solution, unless you're pushing a world's-first on a boss that wasn't released on the PTR--then the problem may not have a solution until Blizzard hotfixes it while you're in the middle of your raid. But I digress.
You've broken down the ramifications of the mechanic and identified which aspect is making it difficult...so what action will neutralize it? Sometimes it can be as simple as an add-on giving you a BIGGER WARNING on your screen (complete with Christmas lights and a wacky waving inflatable arm flailing tube man). Sometimes it will require mapping out an actual movement or spell choice strategy ahead of time. In my specific case, it was the latter.
I had identified which situations were problems: hammer dropping next to me (not on me, I never got hit by the hammer itself!) or hammer dropping very far away from me. The hammer dropping at some midway distance was no problem...seeing the diagonal quickly and moving into it was easy.
The answers, once I knew the precise nature of the problem, turned out to be easy.
- In the case of the hammer dropping right next to me, I had to move away from the hammer on the diagonal vector. Standing next to it, even on the diagonal, wasn't sufficient. If I saw that the hammer was going to be right next to me (and you do get an indication ahead of time), it was time to shield the tank, maybe put a Renew up, a Prayer of Mending and then get the heck out of Dodge. Get to the new spot and then spam fast heals to make up any deficit I had fallen behind on while moving.
- In the case of the hammer dropping far away, I had to move forward into melee range, not backward looking for the diagonal. The hammer is always dropped far enough away from Ragnaros that a wave will never blast through his hit box. I can't stand in melee all the time to passively avoid waves because (designers being crafty like that) Ragnaros has a silencing knock-back...if you're standing in melee range and casting when he does it, you get locked out of the spell school you were casting in for something like 5 seconds (which is an eternity when the tanks are dying). But running into melee range and then back out immediately, after the wave has raced past, causes no ill effects.
Once I put these fixes into action, things got better immediately. It was immensely easier to avoid the waves and with minimum thought and movement (the better to use that thought and time for healing decision-making).
So the third step of the process is to create a plan that will work around the problems you've identified.
Step Four: I Forget What Four Was For
So, that's The Process. It's always nice to have a process to work through to solve problems. Admittedly, none of the steps I laid out are a revolution in logic, philosophy or spirituality, but it's good to formalize a thinking process rather than fall into the "Well, that sucked, I'll try to do better next time" trap. That's surprisingly easy to do and very tempting...you know the mechanic, you messed up, you'll just try harder next time. However, if there's a specific problem that's causing you to miss the mechanic, you'll probably keep failing at it until you (implicitly or explicitly) go through the above process.
Ultimately, if you still keep struggling with the mechanic, it's probably a bug. Or latency. Or a lag spike. "It was the craziest thing..."
Wednesday, September 7, 2011
How To Win Raiding
Those of us who enjoy the raiding aspect of the game are always seeking to raise our games, step up our efforts and engage in other sports/corporate cliches. In short, we want to be the best raiders possible. However, raiding guides usually deal in rather obvious tips like "Stay out of fire" and "Always have a food/flask buff." Those might help, but if you really want to become a truly pro raider, you need the advanced secrets of raiding.
That's what this piece is about. How to squeeze out the extra throughput that average raiders simply don't attain. Read on.
Select The Right Music
The right music in the background will make or break you as a raider. Average raiders listen to the default encounter music within World of Warcraft or to nothing at all. The finest raiders in world ranked guilds select the proper pop/rock/hip-hop/electronica/R&B/soul music to push them to higher levels.
So what is the proper music? That's a trickier question, as it doesn't follow simple rules. This isn't something basic like gear itemization; this is complicated. It has to be a playlist that energizes you at the right times but provides some chill cooldown when you need to recover your intensity. Ultimately, this is a difficult one to spreadsheet, though I'm working on it*.
*Preliminary research is revealing that balearic dance-pop is likely the "primary sound" that will be the baseline against which all other genres will be weighted, for all classes
When Forced To Move, Jump While Moving
You move faster when jumping. This has been empirically proven*. Further, jumping when casting an instant spell supercharges it slightly (though it's a non-stacking buff, so don't jump multiple times before casting it). I think Elitist Jerks had a thread on this at some point. In any case, I've never seen anyone specifically deny this. If you have to get out of poison, jump while moving to your new position.
*"Empirically proven" means "it feels true."
I shouldn't need to explain this...the faster you move, the sooner you can start DPSing or healing again. And stronger spells are always nice*.
*There is a reason restoration druids always top the healing meters.
Mentally Tack On A "Loot Phase" To Every Boss
Beth'tilac has three phases. The phase which she spends her time atop her web, the phase in which she descends to attack the raid directly and the phase in which you collect the loot she drops. Rhyolith also has three phases. Etcetera. When discussing boss strategy, it's important to know that this is the phase you need to reach*.
*This also makes explaining the fight to new recruits much easier--just get to phase 3 (or whichever phase is the loot phase for a particular boss)
Bonus Patch 4.3 Exclusive Tip: Dress For Success
This is really not a tip you can put into effect right now, but it's worth discussing since you'll soon be able to address this issue. Currently, Blizzard has introduced an RNG obstacle in raiding--the negative effect of ugly raid gear. Some tiers the gear is decent in appearance, some tiers the gear looks designed by a bored monkey. You have no control over this and Blizzard intends for this to be an RNG effect...it's filed under "demoralization effect" (distinct from disorientation, fear and stun effects).
However, patch 4.3 will introduce transmogrification...an ability meant for prepared raiders to remove this randomness from encounters, much as tanks push crushing blows off the table. You'll be able to modify the look of any visible piece of equipment you wear to any other similarly-slotted piece of equipment that you own, with a few restrictions. This means that it is incumbent upon you to create a fashion style that will remove the demoralization effect any time that your raid gear looks terrible. If you don't do this, you cannot honestly claim to be giving your raid your best effort.
Subscribe to:
Posts (Atom)